1. Base mesh consisting of all quad polygons, and a simple uv layout created in Maya and imported into Z brush

2. Using "General to Specific" work flow roughing in large landmark shapes with the clay and smooth brushes

3.Carve in using standard brush and a tight alpha to refine initial rough in.

4. Continually repeating a rough in, and carve in, approach to create facial features and action lines of the face.

5. Building up shapes and volumes, Carving in lines and accents. Creating adjusting smaller shapes.

6. Refining, shaping , a-symmetry, Gut check with peers, get coffee, Examine with fresh eyes.

7. Detailing with alphas and spray stroke.

8. Slash spray, and stroke.

9. Pores with alphas and Drag Rectangle stroke

10. Body Rough in same method. Big shapes, then medium shapes, then small shapes and refine

11. Carve in general lines and accents

12. Refining shapes

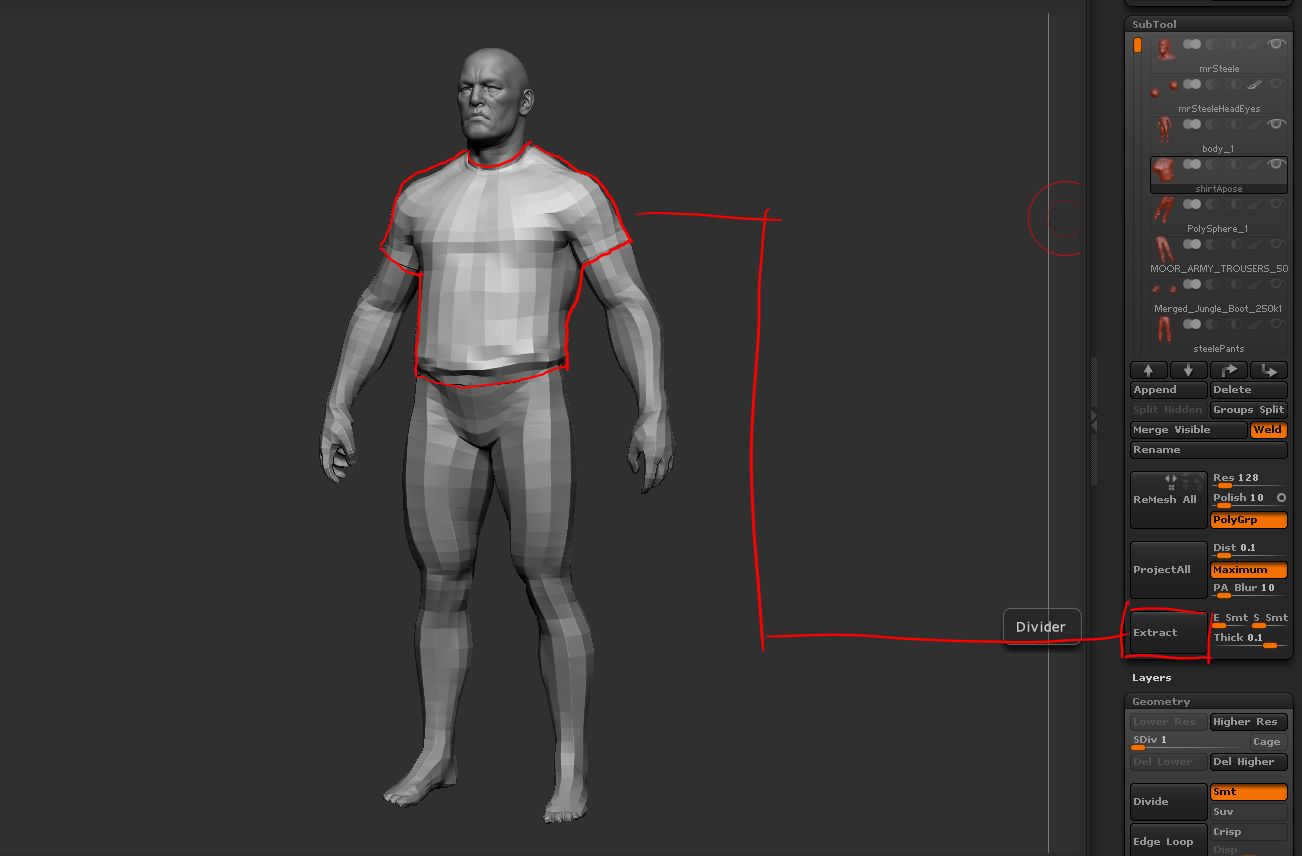
13. Using extract to create a form fitted shirt
14. Repeat process General to specific, big to small

15. Cloth and drapery difficult. I use alphas to guide wrinkles and create happy accidents.

16. Alpha wrinkle details sprayed on lightly

17. Scan Data. Mixing 2 scans and editing wrinkles .
Technical stuff>
A. Using transpose I position and rotate the scans to line up with the underlying body.
B. Extract or clone delete all but low poly legs and project onto First scan
C. Store a morph target and project the mesh onto the second scan.
D. Use Morph brush to paint off the undesired areas of first scan
E. I also use layers to store projection strength and mix with the morph brush

18. For the belt
A. I import a portion scan of a Garand belt and capture the object as an alpha and edit the alpha to tile using photoshop.

B. I created a long flat plane in Maya and shaped it around the waist using a blendshape.
C .Imported the plane in Z brush and stored a morph target to be used later .
D. Imported the flat plane (stored in Maya as blendshape) into Z brush
E. Import the tile-able alpha texture of the Garand Belt

F. I adjust my alpha properties and set my brush to lazy mouse backtrack using the stroke properties,allowing me to lay a repeating tile-able alpha stamp in a perfect line.


G. Then I "switch" the morph target so the belt moves to the original position around the waist and retains all the sculpted data.


Low Poly Work Flow
1. Import a med level resolution object from Z brush into 3dCoat as a reference mesh.

2. Low poly faces are created and defined by points and edges dropped onto the high res surface. Sometimes using the same base mesh as the original high poly base mesh speeds up this work flow. Creating and defining key loops is the focus.

3. Once the loop structure is roughed in the model can be subdivided to the desired resolution. Points and edges can be smoothed out and repositioned using the brush tool. Edge loops and edge rings can quickly be added or removed.
All these topology changes occur while being constrained to the high res surface.

4. Once the Low Poly mesh topology is finished I mark a few edge loops to act as UV borders, and run a quick UV unwrap operation on the mesh to speed up Unwrapping within Maya.

5. Once topology is completed I return to Maya for clean up work on the model, a final UV unwrap pass and texture map creation.
Here Ill add eyeballs, mouth sock, and teeth to the mesh.
UVs
I typically use unfold on the UV shells and quickly pack them into the texture space.Once I have a quick and dirty layout I edit the shells with falloff or UV lattice to get more pixel density.

I Cut the Border edge faces of the shell and Stitch/Sew them to the seams Border edges and unfold.
Then I reCut the border edge and return to its original position.
This ensures that the seam edges of the UVs have exactly the same amount of pixels from one border to the next reducing or eliminating Normal map seams.

6. Once the UVs are finished I import my High poly meshes and store them in a layer.
Ill use Transfer Maps within Maya to render out all texture maps.
To Automate this process I wrote a simple script to set up the AO baking process with 1 click ( usually a confusing multi step process with numerous inputs and potential for user errors)
7. Final result of Low Poly mesh and the Normal and Ambient Occlusion Maps.

